Thursday 21 December 2017

Task 4 - Actions Taken from Crate Feedback

Actions Taken from Crate Feedback

The feedback that I receive from my peers and my friend from the industry, really helped me to develop my crate designs further. Below is all the feedback I made from the three crates.

Crate 1


For me the first crate was always treated as a test, but still I wanted to improve it a bit. I changed the normals on the side panels to make it more cleaner. I also removed some broken decals designs on the crate to fix the error that was happening on the top part of the crate.

Crate 2


Crate 2 had the biggest changes of them all. I completely reworked the design of the crate so that is stand out more. I was not happy with the first design becasue it felt too plain and simple. With this new version I have put more effort into the normal and height maps to really give the crate some volume.


This also means I had to redo all of the UV too. They are now much cleaner and more spacious. Meaning texture quality of the textures is improved. The last once was a complete mess and there were many way I could improve it. Taking what I learned over the years I made a cleaner version and made proper use of the UV space.

Crate 3

For the crate 3 I did some slight changes. I redesign the decals of the crate so that they feel more rugged and they do not copy the Destiny style too much. I wanted this crate to show more wear and tear and by doing some slight grunge work over the decals, I achieve that style. 


In addition to this I also sorted out some of the light issues with my third crate. I had to make the textures separately so that I do not encounter any artifacts. I also applied this same method to the other assets on this third crate too.


Tuesday 19 December 2017

Task 4 - Recap of Design Decisions Taken

Recap of Design Designs Taken

Even though making these crates in something that I have done a few years ago, it is still good for me to go back and try out some new techniques, which is something that I did in this unit.

Making these crates with such a low poly count has been tricky for me, but it is indeed a common practice in the gaming industry. The website Sketch Fab has a collection of low poly models, showing off the amazing work this people can do with such a ow poly count.

One good technique that is used for low poly modelling is the sub-division. Polycount and OpenSubDiv all explain about subdividing and why it is useful. Because I am working with low and high poly models, using this tool will allow the models to keep there geometry. 

This is a method that is used for clean ups which I have explained here.

I always had some second thoughts about using subdivisions and clean-up because I thought they would give me issues. But what I discovered is that this kind of technique is ok to hard-surface modelling. As long as it is still in.

It is also dos not effect the model in the game engine too. This quote was take from the user SinnerSaint from Renderosity  

"Triangles rasterize quickly, and make it really easy for the render engine to process.  If you're goal is output to RT (Real-Time) engines, then using triangles is easier and faster than dealing with quads, which is why game engines use triangulated faces."

It is by following these industry standard practices I am able to make this crates to a professional quality. I always used to making lots of quads since I made a character in the past. But by now understanding the differences between organic and hard-poly modelling I know when to use the subsurface and how to correctly lay out the topology. 

Monday 18 December 2017

Task 4 - Feedback from Crates

Feedback from Crates

With all the crates done I will know start to get some feedback from them. For this I will be asking my peers and some people from the industry that I know to help me with this feedback. I will need using sketchfab to crate the crate renders.

Note: The crates do not have their clean ups on them. They will be added at another time.

Questions for Crates

1. What do you think of the colour scheme of my model? Does it fit the sci-fi theme well?

2. What are your thoughts on the textures? Do they feel like they are from a sci-fi game and is the UV structure suitable?

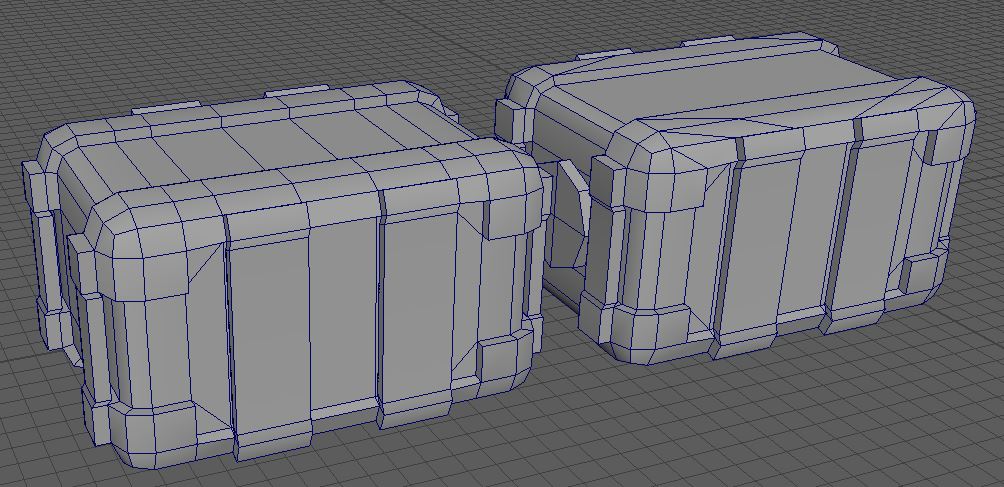
3. The models all follow the 1500 tri count. Do you feel like I have made the most out of the 1500 tri count and if not, how else do you think I can improve it?

Animations

1. What do you think of all the animations I have used for the crates? Are they too simple?

2. The rotation on the crate 2 is supposed to have an industrial feel to it. Do you think the animation achieve this?

3. The 3rd crate has some complex animations, but I have added some decals too. Does this crate need to have some animated decals or is it ok as it is? 

Crate 3 Special Question

There are two secrets on my 3rd crate. Have you found them and if you have, how easy was it to discover? If you haven't here is the answer (hover the text to reveal the answer)


The P2K7 is a reference to the game Persistence, which got announced in 2017.


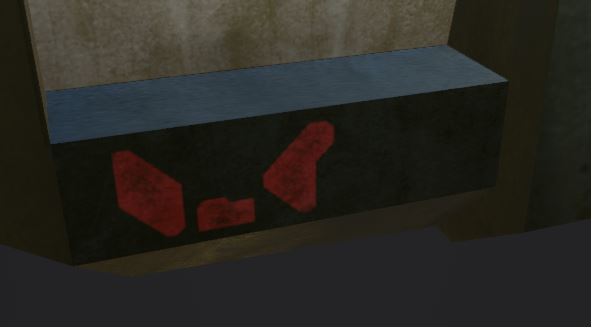
The symbols from the bottom left of the crate are actually numbers from the gun Skyburners Oath (Destiny 2). The numbers are 617, which is June 2017 the month that Persistence was interviewed at E3.

Answers for Crates:

Answer 1

Wayne Crate 1, Question 1: I think the colour scheme is used well, it seems to fit together - yellow/green/orange and blue - quite typical colours in a stylised sense as mentioned in my

Wayne Crate 2, Question 1: Again the colour scheme is quite simple but works well, few colours are generally good as opposed to too many. I like the metallic brown/silver contrast

Wayne Crate 3, Question 1: Once again the colour scheme offers an effective and alternative to the other 2 which is good, no issues with the colour personally.

Andrew Crate 1, Question 1: The colour scheme seems okay for the theme

Andrew Crate 2, Question 1: The colours seem okay for the theme, quite simple.

Andrew Crate 3, Question 1: Again, the colour scheme is okay, and seems to fit the theme.

Answer 2

Wayne Crate 1, Question 2: Your first crate is pretty cool it has a cleaner, sharper edged sci-fi look, more stylised than realistic PBR I'd say? I'd imagine it being in a corridor of a clean facility or a medbay type thing? I noticed some strange normal artifacting/colour bleeding underneath although you did say it hasn't been cleaned up maybe it's because of that.

Wayne Crate 2, Question 2: Textures are alright, maybe you could add some normal additions to the main strips on the side, just 1 or 2 to give it a bit more life? The normals on the top and bottom might look better filled with another material or something - just an opinion. Lastly the large circles are quite pixelated without going too close to the model in some instances.

Wayne Crate 3, Question 2: The textures on top with the extruded panel are a good idea but something seems wrong, not sure what it is - if you rotate the light around on top you can see some strange errors? It seems related to the normal map at first thought. Also around your bolts there's a square sort of bleeding effect? Take a look. Other than that I like the normal stamps and detail placement more than the other 2, pretty cool. Also not really a texture comment but I like your choice of vents on the side, I like that they're modelled in it's effective and well designed/low poly. Because your tri count is so low you could afford to do this which is a good thing.

Andrew Crate 1, Question 2: I couldn't see the full UV layout due to issues with the viewer, but there are a couple of bits where the normal maps are a bit pixellated or distorted, like the arrow in the top.

Andrew Crate 2, Question 2: The textures are okay, but there are places that are quite pixellated, like the top panel. There are some areas of the UV that are quite tightly packed with no padding which causes some bleeding.

Andrew Crate 3, Question 2: Again, there's some areas where the UVs seem to be a bit close with some bleeding coming through at the edges. There's some strange banding effect in the normal on the top piece.

Answer 3

Wayne Crate 1, Question 3: 1.1k tris on your first model pretty nice amount, you do have some ins and outs and a rounded part that is animated so that inevitably adds to the count. I assume it's tied off well as a result of the low tri count.

Wayne Crate 2, Question 3: I'd say this tri count is potentially more impressive than the first as there's more in and outs although this is most likely simply due to the fact you have no cylinder type shapes tied into your model, either way though it's a nice small count again.

Andrew Crate 1, Question 3: The model shown doesn't seem to make good use of the poly count, but apparently this is the wrong version of the model?

Andrew Crate 2, Question 3: The poly count is pretty good, I like the parts where there is a gap behind the vertical bars. There is potentially some room for more detail as the count is so low.

Andrew Crate 3, Question 3: Though it is under the poly count, it can be a lot more efficient, there are whole sides which are many polygons which could be reduced to just one or two. This could open up adding more modelled detail.


Special Question Answers

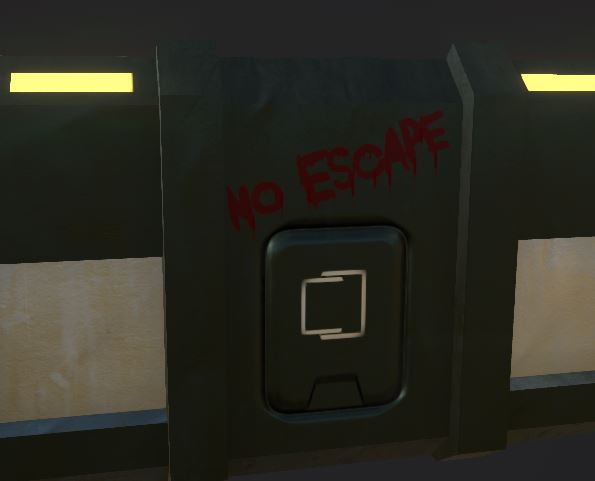
Wayne Crate 3, Special Answer: Hmm i'm not sure about any secret to be honest, I feel like the 'No Escape' is one, which would make sense in a survival horror game. I feel like the other is 'Nova Core' but i'm not sure what the reference is exactly.

Andrew Special Answer: Not really sure of the references, is it to do with the spray painted message?

Rob Special Answer: Not sure. The red logo and the 'No escape' text maybe? If it is, I don't know the context to realise they are secrets. Couldn't find any text to hover either.

Animations Answers

Answer 1

Rob: They seem fine. You don't want too complex animations for a crate, unless there is a specific call for it.


Answer 2

Rob: Hmm...hard to judge without understanding the purpose of the animation, why it is rotating. I did notice on one side the animation jumps slightly as it transitions back to the start.

Answer 3

Rob: You could maybe have some lights flickering on, or an animated readout on the screens, but not essential. 


Sunday 17 December 2017

Task 4 - Sketchfab Model Uploads

Sketchfab Model Uploads

With all of the work done I can now start to present my work. Even though I have done a level in the Unreal Engine, I decided to also upload them into the SketchFab. This website will allow me to present all of my models in a turntable format, giving the viewer full control of my model. In addition to this they can also see the topology and texture maps of my models so they can see for themselves all the details I have put into the crates.

Crate 1

Crate 1 in SketchFab
This crate was treated as more of a test for the other two models. I wanted to ensure that the tessellation process for my models were correct, in order to get the best rendering results and I wanted to try out the some other texturing techniques. What I did learn from this create is that the AO (ambient Occlusion) can affect the texture of my models. I get getting some strange artifacts around the edges of the crate. By adjusting the self occlusion to "by mesh" it remove the errors, resulting in a cleaner model. The crate does have a decal error on the UV, but this could be because of the UV clean up. In the end this was just a test for me and this knowledge came in handy when I made my other two crates. The animation was also simple and I did encounter any issues with that.

Crate 2

Crate 2 in Sketchfab
Crate 2 proved to be a simple model with a lot of issues. My first impression of it was that it lacked a lot of style. It was to plan and clean, so I decided to change the overall design of the model in general. My main focus point was on the normal and height maps, to ensure that I do to go too high on the poly count. The UV's had to be re-done, because even though I fill the 0-1 grid on the texture sheet, it look like a mess and there was a easier way I can clean it up. This was also a much need change to due a big artifact error on the edges of the crate. The seem on the model cause that error and so by change the UV's, I was able to not just solve the problem but also make it more efficient. I am very pleased with the results in the end. Like the first crate the animation went smoothly, although I did had to do some adjustments to the key frames to avoid some looping errors.

Crate 3

Crate 3 in SketchFab
By far my favourite and controversial crate out of the three. This crate has some textures that can only be done in the Unreal Engine, but as for the other textures they all work without the Engine. I wanted to do something that is seen a lot in the gaming industry and that is referencing other games. This crate has a reference to Destiny, but to avoid copyright issues I removed some parts of the decal and added in a grunge to give it that rusted feel. This crate also had some numerous lighting and baking issues but were easily fixed thanks to the knowledge I learned from the first one. The animations in this care are also more advanced, using a combination of translations to make the doors on top of the crate open and close. It is clear this crate is most suitable for a game and that is why I put the most effort in it.


Task 4 - Applying Lighting in the Unreal Scene

Applying Lighting in the Unreal Scene

The Crates Unreal Scene with lighting
With the crates now in my scene I decided to add some lighting effects to them, to further improve their visuals. I did a lot of work with the post processing, change the temperature, bloom and other features to create a scene that is similar to the game. In end result is a scene with a low light which is what I was after, but I feel that it is a bit too dark. The game does use a lot of low lights levels, so it is good to see what they are like in this quality.

In-game footage from the game
I looked through a lot of videos of the game in question in order to get the lighting that I want. I noticed that they used a lot of emissive textures for there assets. There are indeed some present in my models, but not enough to light up a whole room. They seem to also have done some work on the fog density, to crate that gloom feel. For my Unreal scene, I have captured that look, but there are a lot of point light in that scene with their colours set to gold. I still feel there is more work to be done, but for now it is a good scene to show of my crates. 

Saturday 16 December 2017

Task 4 - Models in Unreal

Task 4 - Models in Unreal

With everything complete, I can now move all of my models and put them into unreal. In this Engine I can now add additional details that I could not add before, such as the decals and blueprints.

The crates in the Unreal Engine
 As you can see in the image above I have placed the assets into the two sections. The left side contains all of the animations and the right side has the static meshes. This will allow the player to take a look at both the static mesh and the animated one and see how they function.

Extra Features 

The Crate 3 Texture, saved as a PNG
With the crates added , I added in the decals for the third crate. This was created via the use of Photoshop. In this software I made a power of 2 image with three colours set to the RGB channel. Once done I then sent this over to the engine.

The Crate 3 Decal material
As you can see in the image above I have made some additional changes to the material so I can make it functional. The blend mode has to be set to additive, the shading model to unlit and a rotator to the RGB UV's. Then I can now adjust the speed of the channel so it can rotate. But with the idea in mind I can now take it further by applying some vector movements to the materials, so they can do more then just rotate.

The nova core logo as a decal
With the knowledge of decals I learned form that blueprint I applied it to my Nova core logo. By doing this, it gives my crate more interactivity. The decals are just for show however, but if this crate was taken into the game project blueprints can be added to make them flicker or even change colour to show the stats of the crate itself.

The Nova Core  name decal
As for the name decal, this was done via the use of a panner in the blueprint. By adjusting the speed on the x axis the text will more slowly to the side. I had to make sure that the text is set to the right texture size to avoid any jumping on the animation. 

Special Crate Textures in Crate 3

Special Crate Textures in Crate 3

As I mentioned, this 3rd crate has some cryptic clues added to them. I will now explain what they are what actions I need to take if I need to.


This decal is a reference to the game The Persistence, which was released in 2017. There is no copyright issue with this and so I will keep it on.


This decal is a very good cryptic clue...but at the same time is a massive copyright issue. There symbols are actually from the game Destiny. The weapon Skybuners Oath has special symbols that represent numbers. The number is 617, which is June 2017 the month Persistence was interview at E3.


The final clue is yet another reference to Destiny 2. When you invert the large square and rotate it, you get the cabal symbol from the game.

Actions to Take

While the name one is not much of an issue, the skyburners numbers do need to go. However the square at the back will stay because I am not breaking any laws modifying the symbol to my liking.

The bonfire (Dark Souls) in Overwatch
But the real reason why I did it is because a lot of top games make a lot of references to other games. For example the iconic bonfire from Dark Souls can be seen in the game Overwatch. This is a nice nod to the game, but at the same time this is a copyright issue.

The Skyburners Oath weapon
I wanted this crate to feel special, to have a sense of purpose and the get players to understand why I added in those decals. It is those kind of topics that help broadens out of crate further and they may indeed find something else on that crate that I may not have explained here. Why...to add that mystery element. 

Wednesday 15 November 2017

Task 4 - Animations

Animations

This part of the development process is a long task, depending upon the models themselves. I decided to give them a simple animation, so that I can focus more on the textures. All of the animations have a rig on them with the root being at the base of the model.

Crate 1


This crate uses a simple up and down motion. Like the textures themselves, I used this model as a way to practice with my skills. I have not yet added the texture change for this animation, but this is something that I can add in the Unreal Engine. I am happy with the results of this animation and it's suits the sci-fi theme well.

Crate 2


This crate would have had a complex animation if I added in that extra cylinder, but it would have pushed the poly count higher, so I removed it. Just like the last crate I gave this one a simple rotation animation. This will tell the player that this crate has a function other than just being a static box.

Crate 3

  
This crate is the one I spent the most time and has some complex animations. They may be simple, but I need the make the doors be in sync and open with eachother. This also has the closest feel to the crates from the game, in terms of design and the animations functions. They all seems to have crates that open up, so it was fitting to make an animation that does just that. I feel like I don't need to add another other improvements this crate, but if I have enough time I may add more animations.  

Sunday 29 October 2017

Task 3 - Addressing Texture Issues

Task 3 - Addressing Texture Issues

From the feedback I have received, I have made some changes to the crates. Some of these are minor, but will help with the overall visual of the assets.

Crate 1

An updated Crate side panel
I decided to replaced the side panel normal with another one that is more cleaner. By using the edit mask and mirror tools, I perfectly applied normal to the selected faces of the model. This made the model look more presentable and remove that visual error.

An emissive error on the model
When I imported the model into the unreal engine, I noticed a strange light coming from the top part of the crate. Upon further inspection I discoverer that the emissive texture has overlapped with a part of the UV, causing the light to appeared from that side. I decided to just rub out the emissive that is close to the edge, but another way is to just re-position that UV part.

Crate 2

The error line on crate 2
The crate 2 model has an unusual artifact on the edges of the model. At first I thought this was just an normal issue, but I realised it is more than just that. The only way I can of fixing this is to re-do all of the UV's. This will cause some hinders to time, but if I have it, I will do it.

The new crate 2
I decided to not just fix the line error but also re-do the whole model. This means that I had to do the UV's again and the textures. The good news is that this is a simple model, meaning that I can do it quickly. With this free time I was able to improve the appearance of the crate in general, which in my opinion lacked some visual effect.

The old crate 2 textures (left) and the new cleaner one (right)
 As you can see in the image above, the UV of the crate 2 have been dramatically improved. Not just it looks cleaner, but the free space allowed me to add much more detail into the model leading to some extra decals in this improved crate 2. I am very pleased with the new improvement, although I still feel it needs some more adjustments. 

Crate 3

The light error
Again like the second crate, there seems to be another normal issue. The doors outline got baked into the base of the model, so what I have to do is re-import the model into substance painter with the doors away from the base. This should fix the issue.


The doors and computer fixed

By just saving the doors as an fbx, I imported them separately and re-applied the textures. Since I was doing this, I also did the same for the computer too because their were errors present in that part of the model. In addition to this I changed the top panel a bit to make it look more like a computer.


  The changes made to crate 3

Taking the alterations further, I added some extra effects to the 3rd crate. The addition of some blood streaks helps make the crate stand out a bit more. The Cabal numbers that I mentioned in my previous blog have also been altered to prevent any copyright issues. While doing this I also found an emissive issue. This was also the same one with the first crate and so it was easily fixed.

Saturday 28 October 2017

Task 3 - Texture Inspiration

Task 3 - Texture Inspiration

Just like the crates, the textures too were made from a reference. below are the references I used for the crates.

Crate 1


I took the design of the lines from one of the games crates and applied it to this model. I want the crate to feel dangerous, so by adding these it will get that feeling. 


I also took the core idea from the game too. Since they were using these kinds of tools, I decided to add one into my model too. That way my crate will fit well into the game.

Crate 2


The whole of crate 2 textures came from a crate in their game. This crate is nothing more than an exact copy, but of an different variety.

Crate 3


The colouration of this crate came from  a model on my pinterest board. I wanted this crate to have an militerary appearance ans so I went for this colour scheme. Plus it is a lot different when compared with the other two.


Some decals from the crate were made by myself...but have their own twist to them. They are cryptic clues that will require the viewer to think outside the box. However one of them is indeed a copyright issue and might have to be removed fro the game. I will explain further about this in one of my blog posts. 

Friday 27 October 2017

Task 3 - Substance Textures

Substance Textures

All of the textures that I need to create my textures can be done on Substance, an industry standard software. It is here that I can apply my normals, AO (Ambient Occlusion) and emissive textures and they can be done every quickly thanks to this software.

Crate 1 Textures


Since this model was used as a way to practice my techniques, I did the same for the textures. I tried various styles to try to capture the theme from the game project. The decals and normals maps also resembles the references models, but I made a different approach for them. At the moment, I am happy with the process, but the base mesh for the crate does need some work. I tried my best to capture the look of a sci-fi metal, but I have not quite yet got the design laid down. This will be worked on further.

Crate 2 Textures


For the second crate, I tried to get an exact look as on of the crate in the game, by using the brown metal as the base and adding in some simple details. Compared to the last one there is a little amount of detail in this one, so I may want to add some more to this model. However so far I am happy with this design and that is because I knew exactly how I wanted it to look.

Crate 3


I took I different approach for this crate by using a new colour palette, but at the same time using the same style from the game itself. This crate is looking very good so far and it is by far my favourite one, but I am missing some key decals for this one. These will really help to make it pop some more, but at this current stage it almost looks finished.

All of these crate textures are subject to change and they will be further improved upon during my development process.

Stand


The stand will not have too much detail, since it will be blocked by the crates. What I did do for this model is to add in an emissive texture around the rings to make it stand out more. The top part used an height map for an more realistic effect to the procedural hexagon textures. I did not not want the stand to follow the same colour scheme as the other crates because it will blend into the model itself. It may have been a small task, but I made sure I put some effort into it, as best as I can.

Task 3 - High Poly Models

High Poly Models

The high poly models will be needed for the substance baking process and for the creation of the textures. Unlike the low poly models, there is no limit for the tri count of these models. But they have to capture the overall shape of the low poly model itself.


From top to bottom: crate 1, 2 and 3 high poly models

As you can see from these images above, the high poly models have been overlapped with the low ones. This is to ensure that I will get a clean bake in the Substance software. I may encounter some errors on the baking result and this can be fixing either by adjusting the settings on Substance or adjusting the high ploy size. In addition to this I also added in the high poly model of the stand too. 

Both the low and high poly have all the correct naming conventions (TP_LR_Crate_Low) and use the right materials.

Task 2 - Model Clean-Ups and fixes

Model Clean-Ups

With the models complete, I can now start the clean up process. This is a way to help reduce the poly count on my models and help to add further details on them if needed. The idea of the clean up is to ensure that you do not break up the structure of the model and the tie-in as much spots as possible. Using triangles is ok as long as the model lighting and shape is not altered.

Crate 1 clean-up - 580 tris Unclean - 936
As you can see from the images above, a vast amount of tris have been freed up from the clean up. At the same time the models structure and lighting has not been affected. In addition to this, the clean-up process will allow the texturing process to appear clean and artifact free once I take it into substance. 

Crate 2 clean-up - 860 tris Unclean - 1004
As with crate 1 this one has had its tris reduced via the clean up. This was not much to do with this one, most of the work was coming from the top and bottom part of the crate. But with the extra free space, I can add additional details if I need to.

Crate 3 Clean-up - 688 Unclean - 1124
The 3rd crate was a little bit tricky. There where a lot of edges that affect the structure of this model in a big way, so I had to think of another way to position the edges lines without affecting the model. But like the last model the number of tri counts ha been reduced and will allow me to do some extra work on them.