Thursday, 26 October 2017

Task 2 - Crates Design Highlights and Adjustments

Crates Design Highlights and Adjustments

Following my sketch plans I made the crates under the poly count requirements. I used a lot of techniques to make these, but I will highlight the key task I did in order to complete the style.

Crate 1


In order to get the power core to match exactly to the base model, I used the extract face tool to separate that face. Then it was just a matter of creating the core.


Another method that I used was mirroring. Rather then to just create the whole model, I made one side and the used the mirror tool on the z axis to crate an exact duplicate. This also connects the edges together too.

Crate 2


Creating the bars on this model was a time-consuming process. To make this process a little easier for me, I set the symmetry of the model to follow the middle edge on the model. This in the end will allow me to select to faces on both sides of the model allow me to work on one side while the other is done for me.

Crate 3


The third crate was a complex one to do, which required a lot of models. All of these were grouped together to save me some time, but another technique that helped me was the duplication. By doing a simple CRTL+D command I get the exact same model. Perfect if I am going to use the same model twice. 

Task 2 - Baking the Crate Models

Baking the Crate Models

All of my crate models will have their high poly models baked into the low one. This process will be done on the Substance Painter because it saves me some time and I can also have my other texture maps done at the same time.


To ensure that some of the assets in my model are baked correctly, I crated them in a separated Maya file and baked them to ensure they do not have any artifact errors. Even though you could not see the error due to it being beneath the model, I still wanted to correct it because the player could still see it if they look closer.


Task 2 - Crate UV Light Maps

Crate and UV Light Maps

Because this is going to be added into the engine, I need to make sure that the lighting is acceptable. Even though I can apply a lot of detail in the Unreal Engine, to help further improve the model I can use a light map. These are Textures that contain baked light which, does not affect the lighting in the engine. It's the models way of capturing all of the lighting details and applying them into the engine, without the need of the Engines own.


From top to bottom - Crate 1, 2 and 3

The UV spaces for these light maps are a bit different from the other texture maps. Each UV has to be separated from each-other from 2 spaces and you can now have any overlapping UV. If you do the model will have some light bleeding, affecting the appearance of the asset. All of these UV have been correctly light mapped and are ready to be sent to the Unreal Engine.

Wednesday, 25 October 2017

Task 2 Crate UV's

Crate UV's

This process is something that I have to approach very carefully. If the UV's are not done correctly, I will have to do them all over again. This can also be a long process, depending upon the model.

Crate UV's


Top crate 1, middle crate 2, bottom crate 3
All three of these crates have had their UV's shaped to the correct size and laid out with a size of 2048x2048, which is the texture size this unit it currently using. All of the Uv's are ok, but their may be some UV issues on some of the faces. These may need to be unfolded, so that the textures will not be stretched out. Some of these UV shapes may also need to be reduced, but I will not know for sure until a apply the textures. Overall they are all in the 0-1 space and they are ready to be textured. Any further updates will be posted here.

UV Update 23.11.17


Top to bottom: crate 1, 2 and 3 UV's

During the development process, the crate UV's were having some issues at texturing. This is because I did not pay too much attention to the space of the UV's and this was easily fixed by enlarging some of the areas that require more detailed textures. The larger the space the more easily you can see them and this method as applies for the UVs that the player does not see. By reducing their UV's I can add more space and further add some more details to the models as a whole. As I continue work on this I may have to rearrange the UV's some more.

UV Update January 2018


Top to bottom: crate 1, 2 and 3 with clean UV;s

Taking what I have learned from my peers I applied a clean model technique to my crates  to free up some more tris. But to insure my textures are not affect, I had to make sure I am not deleting any edges that will alter the geometry of the models. If given more time, I would have focus more on make the UV's on crate one and there more efficient. Sadly I miss this grave error due to all of the focus on the texture on those crates. It did not affect the crates in the end, however I should have done better.

Tuesday, 24 October 2017

Task 2 - Stand Model and UV

Stand Model

with all of the crates complete I can now focus on the stand for my models. Even though this does not count as the main unit, it will still help to make it stand out a bit more.

The Stand Model

As you can see from the image above, this is a simple asset, with a low tri count. Because this stand is not part of the main unit, I do not have to worry about the poly count. Nothing else needs to be added to this model, other then the light maps.

Stand High Poly


The Stand High Poly
Just like the crates, I have also applied the high poly details to the model. Even though this is a small asset and you won't see the details on it, I still decided to add this so that textures will be a much better detail when I take it into substance.

Stand UV


The stand UV
The UV's for the model is also simplified. I made sure that the top face has got a lot of room in the UV space. This is so that the details will not be blurred and can be clear to see.


Monday, 23 October 2017

Task 2 - Crate Models inspiration

Crate Models Inspiration

All of my crates have a reference that has inspired me to make this design choice. Below is the breakdown of the crates designs.

Crate 1


The first crate design was crated from the concept art I was give for the project. I decided to take a more simple approach for the design and try to go for a model with sharp edges. 

Crate 2


This crate was made when I was watching the game play from their game. I took this design and made a few changes to it, such as making it look rounder and adding in larger supports. The circle shape was design choice I made, because I wanted this crate to have my own feel to it.

Crate 3


This crate had more of my original design to it. I used my pinterest board to find a structure that will go well with the game in question. I ended up with this image and used it for the creation of my new crate. This one had the most details and once again I referred to the pinterest board for any additional designs.

Task 2 - Crate Models

Crate Models

With the sketch plans completed I can now start the modelling process. Throughout this step I will be creating multiple versions of these crates. This is to ensure that the mistakes that I make can be undone just by using the previous model.

Crate 1 Model Examples


The first shape uses some tubes, so I attempted to add them in. I got the results I was after...but the poly count for them was too high. Because of this, I now had to think of another way to shape this model, but have a low poly count. I decided to leave the tubes out and add in some simple shapes. This in turn will help to reduce the poly count.

Crate 1 Final Result

  
Poly count: 936 tris
Methods used: extrude, append to polygon, extract faces, fill hole, mirror, separate 

Thanks to the simple design, I was able to create the shape I was after be under the recommended poly count of 1500 tris. The tube design is not present in this final model, but the animation method is still in place. That method being a light switch and the energy core lifting upwards. In my opinion the shape looks a but too basic, but this can be fixed via the use of the normal maps. As another interesting twist, I can change the shape of this model, so that it does not follow the same structure as the others.

Crate 2 Model Examples


For this model, I was trying to capture the same structure as the in game examples. Having something that closely relates to the crates in the game, may help them to blend in. At the same time I do not want them to be an exact copy, so I added my own flare to them.

Crate 2 Final Result

  
Poly Count: 1004 tris
Methods Used:  extrude, append to polygon, extract faces, fill hole, mirror, separate, bridge, bevel

Looking back at the examples, I decided to remove the hole and just add in to circle shapes. These will act as the rotating piece for this crate, steering away from the main idea I had for this 2nd crate. The removal of the holes does give me some free polys, which will allow me to play with it some more. This would be a great model to add in some tubes, but I will have to test this for myself to see if it looks aesthetically pleasing.
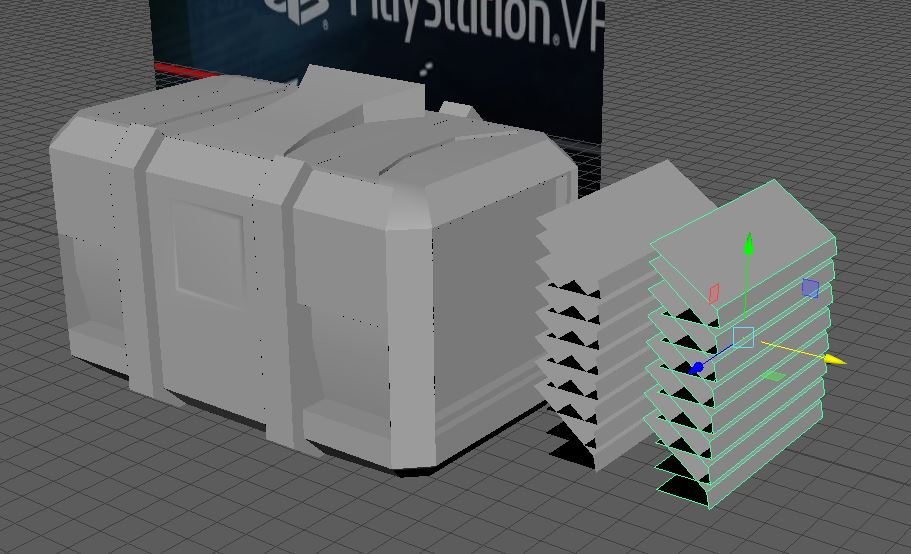
Crate 3 Examples


Following from the second crate, I have made a model that closely resembles the in game example. However I have gone for a more hard surface approach, which in my own opinion looks very promising.

Crate 3 Final Result

  
Poly Count: 1132 tris
Methods Used:  extrude, append to polygon, extract faces, fill hole, mirror, separate, chamfer, duplicate transform

I am really liking the design of this crate and it is clear this will be the one I will be using to present to the tutor. This crate both share appearances with the sketch and in-game examples I have bee given and the animation method is simple but effective. I decided to take the original animation idea I had for the second crate and apply it to this one. I feel like this kind of animation will be most suitable for this model, due to the structure of the model.