Friday, 20 October 2017

Task 1 Research - Trim Texturing

Trim Texturing

When one of the teams from Firesprite came to see our work, he mentioned something about a technique called trim textures. These are quite popular in the gaming industry and can save a lot of time. I deiced to have a look at this method for myself.

A trim texture sheet from World of Warcraft: Mist of Pandaria
From what I have learned from some sources it is a form of texture sheet laid out in a procedually way to allow any model to take their textures. They have to be at a certain scale (like 2048x2048) and the Uv's have to overlapped them so that the texture is applied. This method is indeed used in the gaming industry, like Blizzard for example. But oddly there is little information about it. The only good source I found was this YouTube video. This does help to explain the creation of the texture, but but other then that there is little information for it.

Other sources I found was a presentation for the game Sunburst Overdrive. They explain a bit about it, but not much. The polycount website has a lot of information about it, but the guides they have are a bit outdated. They also mention that it is better on MODO, a 3D software. 

In conclusion I see this as a method for when you are working in the gaming industry. Because I am doing a art test, I see no use in adding this in. I'm only making three crates with very different UV's and textures and if I want to get the best information from this, I'm best going into a game studio. It is there were I can learn everything about it.

Thursday, 19 October 2017

Task 1 - Questions about the Project

Questions about the Project

The sketches that the unit has been given does help me to crate the crates to there specifications...but it does still leave some questions unanswered. Without an actual in-game footage of the crates themselves, it will be hard to create a model that suits their style. Because of this I have made some questions to give to the tutor. Hopefully these will help with the project and can help to answer my concerns.

Concept

1     1. What kind of animation ideas are you after for the sci-fi carte? The concepts show some opening doors but they are not present in the game itself.  
2     2. Does the crate have to follow a certain colour scheme? Based on the in-game footage I have seen, they all use some shades of grey and white, while the sketch ideas are in a different colour scheme. Can I use different colour themes for this crate?
3     3. Does the crate have to be at a certain shape? All then crates that I have seen are in a rectangle structure. Is this the only shape that I can use or can I have a square one?

Model

1    1.    Does the crate have to be intractable to the player? Meaning will there be any special animations the player character will be doing with the crate. It will give me a good idea on the movements I can do with the crate model.
2    2.    Do they have to have a unique rig for the animation? I have made a simple rig with the root at the base or middle of the object. How in-depth do you want the animations to be?
3.       Does the crate have to have some form of gameplay function? Is it a health pick-up, crafting material or power-up boost (like the time warp refill)?  

Wednesday, 18 October 2017

Task 1 - Crate Model Creation Process

Crate Model Creation Process

Now that I have got my timetable planed for this unit, I can now starting thinking about the creation process. I am going to split the model into three separate files. That way I can make multiple duplicates without any lag on my computer. I know I can make all of them in one file, but I can easily transfer them to each one if I want to.

Work to be done in Maya

Here I will create the low/high poly models and add in the UV. Because this is an simple model, I am going to use a lot of symmetry techniques to help make the model feel balanced. Below I will explain the other methods I will be using:

Multi-cut - This too will help me with the bevels and to create some new faces in my model.
Edge Loop - For a more accurate approach and to make the topology feel smooth I will add in the edge loop to help build up the shape of the model.
Append to polygon tool -  More of a way for me to fill out any of the mistakes in the model. I also use it to fill in spots  the "fill" tool wont reach.
Fill Tool - Help me to fill in the whole edge area.
Smooth tool - I will constantly going back and forward through this, so I can get a clear idea of the structure of the mode when it is fully smooth.
Extrude - Helps me to add in new faces and adjust there size and position.
Face selection - If I want to to adjust just one face, then I will use this tool to pick one of them and make the changes.
Chamfer edge - I will only use this tool if I want to make a vertex in my model a quad. All games runs better on quads and so I will always try to keep them as quads.

Work to be done on Substance

Sustenance is the place where I will add in all the texture maps and the high poly model and bake them all into the low poly one. This work method is much more simpler on this software and it save e a lot of time. All of the normal maps and emissive textures will be done here. Depending on the model I will add in some extra maps tat will make the model more cleaner or dirtier.

Work to be done in Unreal

In this engine I will be only making a showcase theme for my crates. All of the assets will be in this single game project and I will make a small room with the correct lighting to help highlight my model. The only blueprint I will be add here is an simple rotation on the caret's stand. I will do it at a slow rotation, so the the viewer will get to see the model details. I will also be showing off the animations this game project and they can be triggered via a button press. 

I have a feeling that I will finish these crates quickly. If so this mean I can rework on them and improve any mistakes I made in my models.   

Task 1 - Crate Design Development Process

Crate Design Development Process

All of the crates that I have made will follow a development process. This is a well know practice in the gaming industry, which involves a pre-production, production and post-production workflow. Once the models have been created and UV they will need to be clean up. By converting some quads into triangles it will save me some poly counts. Plus it will not affect the hard-surface model, so this is a well-known industry technique.

The target poly count I need to meet is 1500 tris and I need to follow my process to ensure the models will be complete on time.

Pre-productuion
  • Sketches - all done with orthographic views.
  • Digital - Taking my sketches further will decal placement and normal designs.
  • Maya - Creating base models to get a good idea of their structure.
Production
  • Adding additional details to the crates such as:
    • separating the models to identify the animating parts
    • Seam placement
    • UV scale and resoluatation
    • Mirror the crate for time efficiently
    • Using subdivisions for more advance model stricture
  • Feedback from crates
    • As part of this feedback the point that I will be covering is the colour choice, their stricture and animation process. It is common in the industry to get constant feedback on your products, so it is something that I want to do for my crates.
Post-production

  • Final design feedback on my crates for any additional adjustments.
  • Model rendering:
    • Using Unreal Engine to show off the static mesh and the animation one. Post-process techniques will also be applied here to follow their mood and setting.
    • Blueprints to show any further animation techniques (flicker lights and decals) 

Saturday, 7 October 2017

Task 1 - Crates Timetable

Crates Timetable

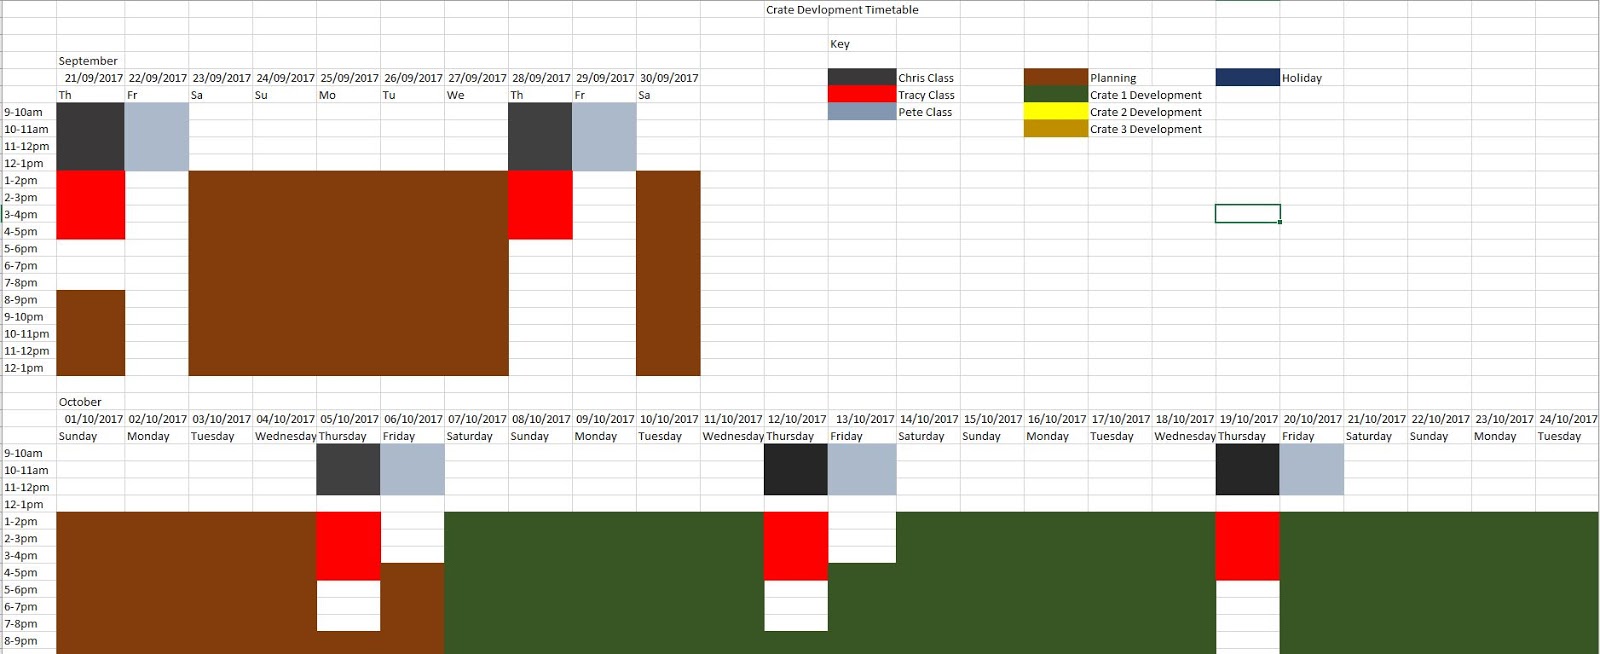
Even though these crates are simple, I still need to put a lot of effort into them. To make sure that I keep up to date with them, I have made a timetable. 

The Crate Timetable
The timetable was made in Excel, which is well known as a good time management software. I put down all of the days I have left in this unit and colour coded each one. The key for this spreadsheet are:

  • Brown - Planning
  • Red - Tracy's Work
  • Black - Chris Work
  • Light Grey - Pete's Work
  • Green - Crate 1
  • Yellow - Crate 2
  • Gold - Crate 3
  • Dark Blue - Holiday
As you can see, I have got a lot of time to do this crates but I do want to do each one of them by the end of the month. There is other factors to take into consideration, such as my other class work and my personal duties. These may hinder my time on the project, but they should not get a large effect on this unit. Thanks to the simple design of these models, I can create them quickly and focus on the other units I need t do.

Seeing my workflow like does, make me feel more as ease with this unit. I know I will be able to do it on time, if I follow this time-frame.     

Monday, 2 October 2017

Task 1 Research - Lighting and Colour Theory

Lighting and Colour Theory

The Persistence Game
When it came to the sketching examples I was given for this unit, I needed to know more about the game. I watched some YouTube videos online to help get an idea on the colour theme of the game. It is clear that they used some cold colours, such as blue and cyan to help build up the sense of isolation.  


In addition to this I noticed that they used a lot of emissive lighting in their game. Because of the dark setting, it is a great way to save some time on the lighting building process, but more importantly it give me the idea I need to make the crate designs.


The crate themselves is something I wanted to see too. They used a lot of hard surface textures and solid stripe patterns. I will attempt to follow this idea, but I want to make my crates feel unique.

  
I tried out the emissive idea on my test crate. I have used them on both the button and the core itself, to give them some interactivity. During the Unreal phase I can add a parameter to alter the emissive texture of this crate, to make it look damaged.

Lightning and Mood


Looking at the lighting and mood of the game on compassion of the in-game crate models they used some simple colours to help make them stand out. In addition to this they also used some simple textures techniques such as normal and decals to help reduce the poly count.


In my 3rd crate I too have applied this technique. By using some custom made alpha brushes that I made in Photoshop I imported them to substance painter and made a height map to increase their volume. This kind of process helps to make my crate stand out and keep the poly count to a minimum.  

Sunday, 1 October 2017

Task 1 Research - Pre-production Process

Task 1 Research - Pre-production Process

In this advanced modelling unit I will be developing a simple sci-fi to a very high standard. This will require me to use all of my knowledge throughout the years in this college to make a top quality model. Because I am doing this to a industry standard I will start with the moodboard ideas.

Moodboard

The crate moodboard

Because I am making the same crate with three variations, I was thinking to myself "what if for the three variations I make a small, medium and large one?". Taking this Idea I made a moodboard with three different sizes. Some of these images where examples from other artist, but some where taken from games such as Borderlands, Alien: Isolation and Destiny. The Destiny one is what got my attention the most, die to the simple animation they have when you open the crate.

Concept Drawings of sci-fi crates Moodboard
I also made a moodboard on the concept art of the sci-fi crates. All of the models that I have seen Begin as concept art. It is an important part of the development process, because it is here that the main idea of the crates get taken into the modelling phase of the development process. All of the crate are shown in a orthographic view, showing off all of the details that will be applied into the models. I will follow the examples of this moodboard and make my crates to these expectations.    

ArtStation


Crate design done by Greg Cox
I also looked into other art websites such as ArtStation to get a better understanding of sci-fi crate designs. The gaming industry always looks into these websites, so by look at other artist work here I can get a good idea of the level of quality I need to aim for. The crates by the artist Greg Cox goes into a lot of depth of the crate design, concept process and shows it off in-game. All of this that I wil mention in my Blog.

Crate Design done by Andrew Porter

Another crate design that I took inspiration from is from a artist called Andrew Porter. The way that the crate opens and closes, gave me some ideas for the creation of the animations sequences. He has also used a good colour theme that perfectly fits into the sci-fi environment. His use of colour theme is something that I will apply to my own crate models.

Polycount


Crate design done by Simmo from PolyCount
For me, Polycount was a good website to use to get some understanding on the topology and geometry of my models. Eve the gaming industry reconise it and has got a mention from the character Roadhog in a Blizzard game called Overwatch. The user Simmo showed off the development process of his crate and got some good feedback from the community. He done a good job with the UV and normal layout and  I like the way he cleaned up his crate model to help reduce the tri count further. All of this, will come in handy when I start the clan-up process of my own crate models.

Crates Collages


Top to bottom: Crate 1,2 and 3 collages

Taking my moodboards further, I have made a collage containing all of the key images I have used for the Pinterest board, in addition to the colour theme and detail ideas. Taking all of these ideas into consideration, I applied them to the sketches to give me an glimpse of a possible design for these models. The theme is sci-fi so my main focus is on the those kinds of crates. and to follow their form and structure. I also want to make them look damaged so it can fit with the Persistence game design.


Monster Nergigante and weapons concept art

This kind of practice is common in the gaming industry. During the pre-production phase they create a wide variety of  possible designs for product and eventually it will lead them to their final concept design. For the game Monster Hunter World the developers go into great lengths to get the elder dragons anatomy and features that they will feel fits their idea. In addition to this they also apply this to the armour too taking into consideration the creatures appearance and how it look for both male and female hunters.


Mindmap

The mindmap of my crate
The mindmap that I have made here include all of the features I intend to apply to this model. There are many ways I can approach this model and by creating this, I can think of other ideas I can add to the crates. The main point I want to focus the most on is the animations. Even though these will be simple, I want to make them as complex as possible. This is an idea that I can apply to my second or third models.

Sketches


To help further my idea I have made some simple sketches for the three variations. I tried to go for some sharp edges, which is what the sci-fi theme is known for. In addition to this I also highlighted the decals I will be using and the way each one will open.

Digital Sketches


When it came to the digital sketches, I tried my best to capture the original design and further improve upon my ideas. My drawing skills are not to the professional level, but I have created a good colour scheme for all three of them. The middle one is by far the least favourite of my three and the top one is definitely the one I will be modelling first. All three of these colour schemes match to the style of sci-fi. They all use metallic, cold colours that help bring out the simplicity of their palette.

Now that I have got the groundwork of my crates done, I can now begin to model them.

Additional Sketch Improvements 13.11.17


After creating the models, I decided to give them another sketch design. The decals and designs that I gave the previous models where a bit too much, so I decided to tone them down a bit. All the crates follow the main theme in the game, but with my own flare added to them. I have changed the second and third design animation due to timing constraints. But I have have enough time, I can make another one that follows my previous idea.